
It’s quite obvious that every Delphi developer who had to deal with component creation knows that in such a situation it’s vital to ensure their sufficient lifecycle. It’s important to highlight that in our article we are going to take into consideration only modern Delphi versions without using ARC compilers. However, those principles that will be discussed below can be taken as a golden rule in every case. Let’s start from the simplest and move on to the most challenging tasks in component lifecycle management.
Component manual management
If you know for sure that the component will be needed only within a short period, it is feasible to create and delete it manually. Especially if it is possible to describe it within one method.
A typical example here is a demonstration of a modal form.
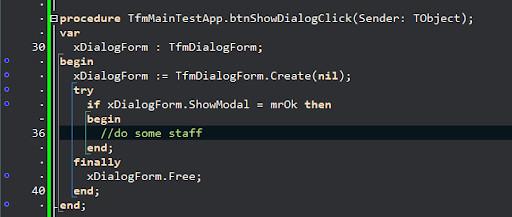
In this case, we know for sure the moment when a dialogue form will be required. That’s why there is no sense to keep it in the memory from the moment of app creation. We choose the dynamic form creation. And we also know that after using the ShowModal method, the form is closed and when the result processing comes to the end, we won’t need this form anymore. Moreover, it will be required to have somebody to finish the result processing to avoid memory leaks. That’s why we should call the Free method.
This approach requires minimal memory and ensures easy code reading.
But as we know, nothing is perfect in this world. That’s why let’s focus on the minuses:
first of all, what if a dialog form requires much time for loading some resources and a user needs to call it rather often? In such a case, we will regularly waste time on creating and deleting this form. And secondly, we should bear in mind that the logic of using will be so simple and linear not always and it won’t be possible to use try..finally.
And now it’s high time to discuss the second method:
Component creation when it is needed
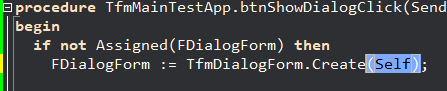
If you suppose that a component can be used often but its use is not guaranteed and there are no restrictions related to the volumes of the RAM, you can create a component when it is required for the first time and keep it in memory. Let’s have a look at how our previous example will change if we re-wrote it for this method:
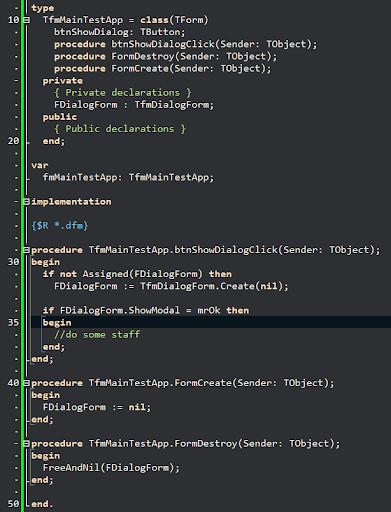
As you can see, instead of creating a form regardless of any conditions, now we check whether it hasn’t been created before. And only if no, we create it. The destruction is now moved to the OnDestroy event of the main form as it is a moment when we can be sure that we won’t need our dialog form anymore. In such a way, we’ve created something like form cashing.
We still create and destroy our dialog form manually as before. But, for instance, the button that allows us to show our form is created and destroyed automatically, without coding. It’s reasonable to ask why it happens so and whether we can benefit from it. Yes, we can use part of it, but not all.
Let’s start with button creation in order not to move far away from the issue under consideration. I will try to explain it without going deep into details:
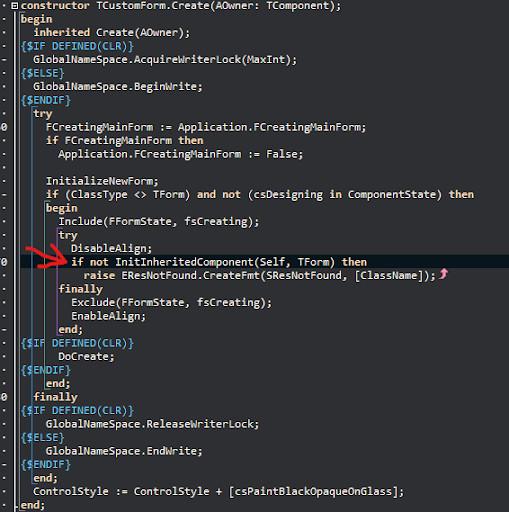
When a form is being created, its constructor contains code that is searching for its DFM code (as well as all its ancestors but these are already extra details) in the app resources.
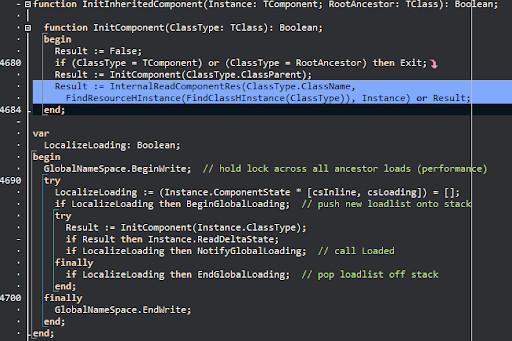
Then DFM-code should be processed by the special TReader class that creates all the components contained there with the set parameters in accordance with their hierarchy and so on. The most important thing there for us is that our button gets the Owner property and it will be on the Components list of the form.
Later on, we can proceed to the process of destruction. The destructor of each component call the DestroyComponents method that checks the list of Components and destroys them one by one.
We can use this mechanism for our purposes by indicating the owner of our form while calling the constructor.
In such a case, the dialog form will be included in the Components list and, as well as the button, it will be destroyed automatically when the owner is destroyed.
With these small changes, we will be able to get a similar behavior of our app but the OnDestroy processor can be fully deleted. The code for destroying all components from the Components collection is included in the TComponent class and this behavior will be observed not only in the TForm (as in our example) but also in all the descendants of TComponent.
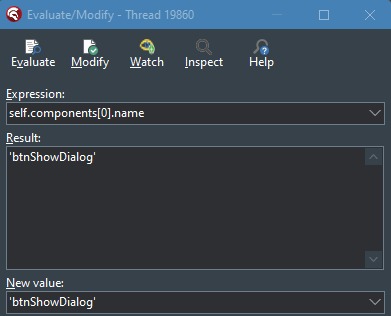
Now let me ask you a question: What will happen if we do not delete our OnDestroy event? We are sure that many of you will say that we will get an Access Violation or Invalid Pointer Operation error. It will be an absolutely logical answer as namely our dialog form and not the address of the FDialogForm variable goes to the Components list. As a result, the fact that after calling the FreeAndNil method it will save the NIL value won’t have any impact on the address that is included in the Components list. It means that at the very beginning we will destroy the dialog form in the processor and then the system will try to do it once again in the destructor of the main form when it will be cleaning the Component collection.
But if we run the app without deleting the event, everything will work without errors. How is it possible?
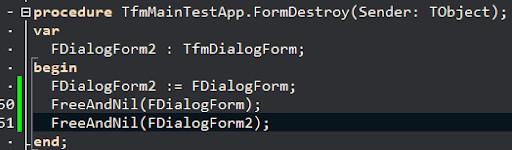
Let’s conduct an experiment. We need to write a code that will have two variables indicating the same component and then to call the destructors one by one.
After running the program, we will get the following situation:
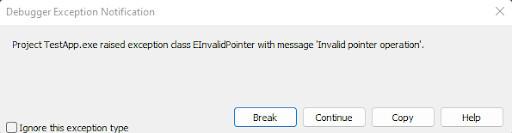
As we’ve supposed earlier, the second calling of the destructor leads to an error. It can mean only one thing: in the case when we delete a component on our own, the destructor is not called twice, otherwise, we would get the same error. Such behavior can be observed only if during the component destruction it somehow disappears from the Components list of its Owner.
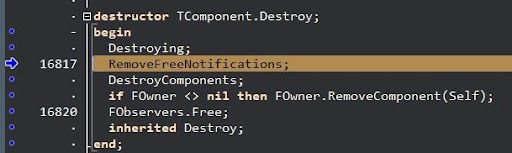
Let’s have a look at the TComponent destructor list:
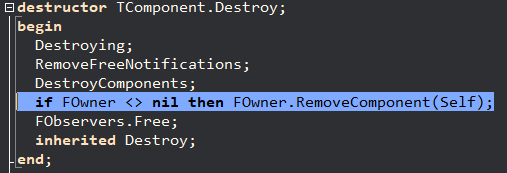
If a component has an indicated Owner, it removes itself from the list via the FOwner.RemoveComponent method. This behavior excludes any possible re-run of the destruction of the current component by the Owner destructor..
Now when we know that all components can automatically solve a part of the possible problems related to their lifecycles and how it happens, it’s high time to make our task more complicated once again.
What if our component can be destroyed by somebody else? Of course, you can check the Components collection every time and look for it there. That’s not convenient but technically it’s possible. And what if we have a link but we are not the owners of the component? A very good example here is the Images property in TButton that can indicate any component in any part of the program. The main condition here is that it should be inherited from TCustomImageList. I think that you all know that there is a variable of the TCustomImageList type inside the TButton component that indicates the copy of the same image list. This variable is used for drawing an icon of our button. It is obvious that nobody would allow the situation of multiple calling bugs or an app crash to happen due to simple component destruction, either it would be ImageList, or PopoupMenu, or something else. It means that there is another mechanism of notifying about component destruction/removal. And this mechanism is called Free Notification.
Free Notification
Free Notification is a mechanism that allows notifying all its subscribers about its removal in order to let them react in a proper way.
As the mechanism, itself is built in TComponent on the basic level, it foresees numerous scenarios of its usage. This approach is good especially given the fact that it is not so easy to break it. But at the same time, this characteristic makes it rather confusing and complicated to understand for those who are not familiarized with it.
The key element of this mechanism is a private variable FFreeNotifies in TComponent. The type of this variable is TList<TComponent>. Consequently, that’s a list of components that our component will use to send notifications about its removal. The whole mechanism is built based on the methods of working with this list.
For using this mechanism “from the outside”, it is necessary to be able to include yourself in this list, exclude yourself from this list and react to the notification. Let’s start with the methods that will allow you to do that:
procedure FreeNotification(AComponent: TComponent) is a public method of the component that includes AComponent to the list of subscribers that will receive notifications about the removal/destruction of the component from which the method was called.
If we return to our example with the form, the code for creating a dialog form using this mechanism will look as follows:

As you can see, now the Owner of our form is not Self. It means that it is not the main form of the app but the app itself. It is done for showing that the relation with the Owner doesn’t play any role now. But we need to subscribe the main form for notifications about the destruction of a dialog form in order not to get an invalid indicator in case of unexpected form destruction:
procedure RemoveFreeNotification(AComponent: TComponent) is a public component method that deletes AComponent from the FFreeNotifies list of the component that called this method.
In our case, this action is rather useless as we work with the main form of the app. But if we consider this method in general for all possible cases, the code should look the following way:

In such a situation we would just stop to observe the lifecycle of our dialog form.
And now the most interesting part: how to react to notifications? It can’t be just calling a method as our code should be executed after the call from our dialog form but we are considering the case from the perspective of the main form of the app. An event like OnShow, OnActivate, etc. can be a good option here. But as you can see, there isn’t any event of this kind. How and where should we write a reaction? The secret is in the “overriding” of the protected-method Notification.
This method is used not only for FreeNotification. It can also unite a great part of logic and mechanisms, especially if we are dealing with one of the highest levels in the inheritance hierarchy (as in our example – TForm). For example, an event appears when a component is inserted or deleted from the Components list. That’s why it’s crucial to call inherited inside a particular method. If we use FreeNotification in our example, the code will change as follows:
Interface part:

As you can see, the Notification method has an override directive. It shows that it is the re-definition of the ancestor method. There are also two parameters. AComponent is a component that sent a notification and Operation is an operation that should be executed with this component. Operation has a TOperation type and it can have one of two values (opInsert, opRemove). While we are observing FreeNotification, we need to pay attention only to opRemove and only if it is executed with our component (with our dialog form). Here is the process of implementation:
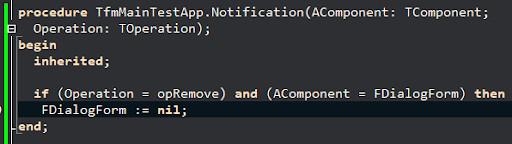
Though the realization is quite complicated, it is fully compensated by the simplicity of usage. Without taking the code that was generated by the IDE itself, for using FreeNotification I had to write one additional code line in order to sign up for an event. A couple of additional characters (in order to let the “Code Insight”redefine the Notification method) and two lines (in order to react and to define the nil value for our variable) will be needed as well.
The best way to remember something is to get a full understanding of how it works. It is easy to forget the exact name of the function but if you remember the principles you will always know in what direction you should move to recollect the details. That’s why for better understanding let’s analyze how the Free Notification method looks inside.
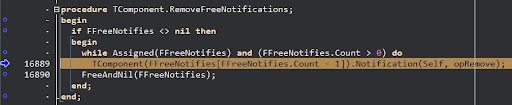
If you were attentive enough you could notice the following line in the screenshot of the TComponent.Destroy method:
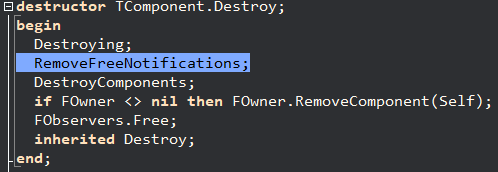
The calling of the protected-method RemoveFreeNotifications is the moment when notifications are sent. It is vital not to confuse RemoveFreeNotifications and RemoveFreeNotification. Though their names are practically the same, this one letter really matters as they both work completely differently.
- RemoveFreeNotification unsubscribes one subscriber from getting notification
- RemoveFreeNotifications sends notifications about its removal to all subscribers.
The mechanism uses one more method with a similar name – RemoveNotification(const AComponent: TComponent). This is a private method that deletes a set component from the FFreeNotifies list.
At this stage, we’ve considered all the methods that ensure the functionality of a mechanism but in order to realize how all this works, we need to look at one small case.
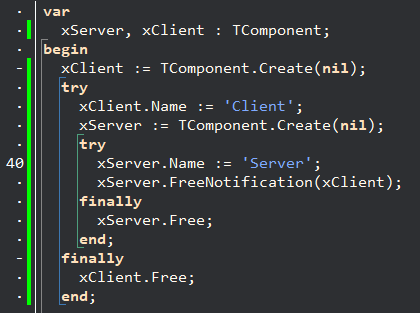
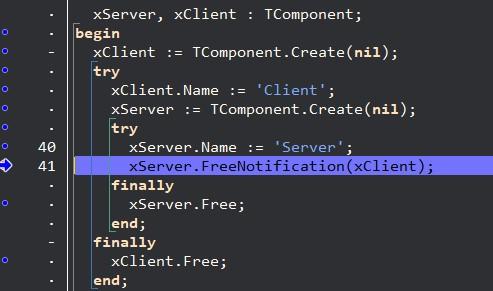
In this case, I have created two components. One of them is called Client, the second one – Server. Client will get subscribed to getting notifications about the removal of Server. Then we will delete Server and analyze the whole process in order to see how the notification will reach Client.
We need to begin coding with creating and assigning names. Why do we have to assign names? This step will further let us easily understand what is AComponent and what is Self at any moment.
Let’s call the registration method and look inside it.
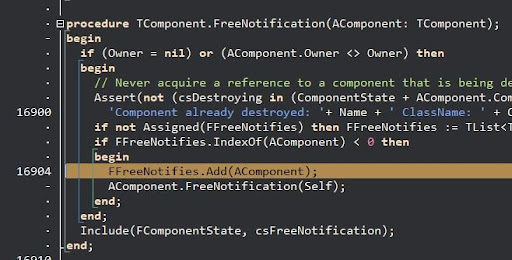
As we’ve already mentioned, the component is added to the inner FFreeNotifies list. But what’s even more interesting is the fact that in the next line we will see the calling of AComponent.FreeNotification(Self).
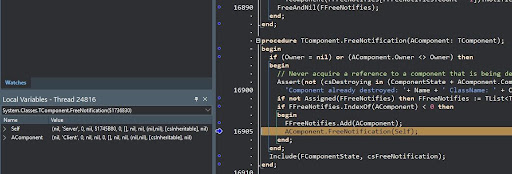
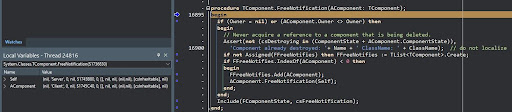
As it is seen in the left part of the screenshot, Self is our Server and AComponent is Client. As a result, it happens so that we change the places of our components and the component, which has been recently added to the list, calls for the adding of itself to the FFreeNotifies list. Let’s have a look:

The screenshot shows that Server is on the Client.FFreeNotifies list. And then we can observe the change of places again.
But there won’t be an infinite loop thanks to this condition:
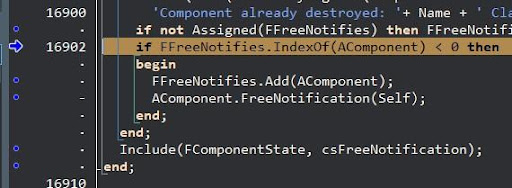
If the component is already on the list, we can just quit this list.
After that we can just go higher in the stack, the registration is over. What has happened? As a result, we can see that the components are able to register each other. It is important to be sure that when our Client is destroyed, Server won’t have any invalid links to it on the FFreeNotifies list. It is quite logical to use the same mechanism that works in another direction.
As a result, we get something like Peer-to-Peer relations. It means that there is no difference in the way that you choose for registration.
- xServer.FreeNotification(xClient);
- xClient.FreeNotification(xServer);
The result of executing these lines is the same. Both these components will register each other in their lists and then “learn” about each other’s removal.
Now we can move on to the removal of the component and check how the process of notifying works.
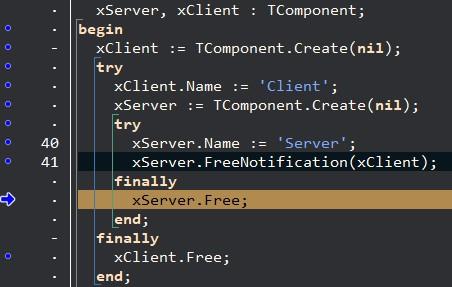
Let’s go inside xServer.Free;
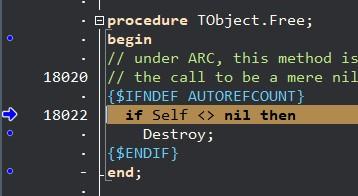
As you know the Free method calls the destructor if a component doesn’t have a value that equals NIL. It is clear but I do not want to omit this step in order not to lose the entire picture of the situation.
The destructor calls for the above-mentioned RemoveFreeNotifications. Now it’s time for its realization.

This method in the cycle calls the Notification method from the last component from the FFreeNotifies list. In our case, it is equivalent to calling xClient.Notification(xServer, opRemove). I’d like to highlight that the Notification method is a virtual one and thanks to its re-defining in descendant classes we have the possibility to interfere in the work of the Free Notification mechanism.
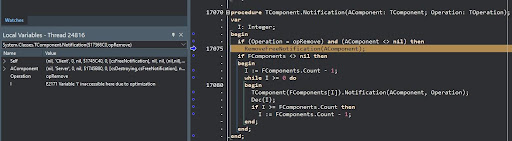
The Notification method in the case of the opRemove operation (as in our situation) calls RemoveFreeNotification in order to continue the process of unsubscribing.

First of all, its own method RemoveNotification is called to remove the component from its list.
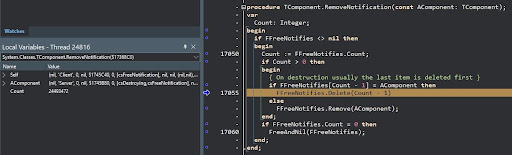
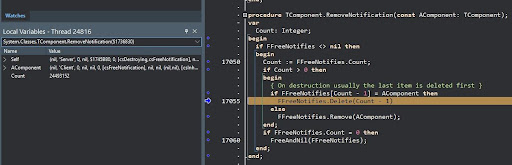
RemoveNotification ensures simple component removal with light optimization.
The second line in RemoveFreeNotification changes the places of our components again and deletes itself from the list of the relevant component.

Now let’s move higher in our stack again. For simplifying the understanding of these processes, we can divide them into stages and describe them as follows:
Stage 1. Registration:


| 12345 | xServer.FreeNotification(xClient);
xServer.FFreeNotifies.Add(xClient)
xClient.FreeNotification(xServer);
xClient.FFreeNotifies.Add(xServer)
xServer.FreeNotification(xClient); |
Stage 2. Destruction:
| 123456789 | xServer.Free;
xServer.Destroy
xServer.RemoveFreeNotifications
xClient.Notification(xServer, opRemove);
xClient.RemoveFreeNotification(xServer)
xClient.RemoveNotification(xServer)
xClient.FFreeNotifies.Remove(xServer)
xServer.RemoveNotification(xClient)
xServer.FFreeNotifies.Remove(xClient) |
In this variant, we’ve tried to simplify the stack and the order of calls as much as possible. A tabulation before the code line is an entrance to the internal method. As we always work with the same type of TComponent, I’ve replaced the variable Self and AComponent with their relevant values. As a result, it has become possible to visualize the calling of the same methods from different sides.
The two-side relation between the components makes the process look more confusing for the understanding of a general mechanism. But thanks to this small example we were able to visualize the entire process. Now when you know the mechanism of all these procedures, there is no need to learn by heart all the details but it will be great at least to bear in mind the fact of its existence. Thanks to using it you will be able to save a lot of time on developing an analog process for your real project. Instead of coding the whole mechanism, you will need just to write a couple of code lines. In the next article, we will consider a real-life example that will help you to learn how to organize subscriptions to events using Free Notifications.